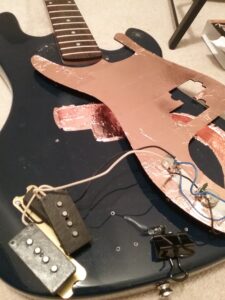
Several years ago my husband was stationed in Afghanistan. He rescued a sad, abandoned bass tagged with a stencil of his unit and brought it home to me, disassembled. To the best of my abilities, I attached the neck to the body and checked it for signs of neglect. Its pickups were not secured to the body of the bass at all, and shaking the bass caused the worst maraca sound. I was afraid to even plug it into an amp. Besides the electronics, it was in decent shape and was playable. I decided that this bass would be my “frankenbass.” A monster I would experiment with, and hopefully bring it inner peace.
When I finally gathered the courage to plug into the amp, it sounded muddy, but not broken. A slight hum from unshielded electronics only became annoying when using the tone knob. Still, I decided that the way forward was through shielding the cavity and pickguard and replacing the pickups. The design of this Silvertone, serial number-less instrument was influenced by the Fender Precision Bass, and my musical style often intersects with Motown, therefore I opted for 60’s replica P-bass split pickups. More specifically, a demo model to fit my budget.
I started with the back of the pickguard to warm up. Applying the copper shielding reminded me of middle school, peeling the foil off of gum wrappers to cover folders and using an eraser to buff out the wrinkles. Side note: I was not much of a gum chewer in middle school. Per some internet advice, I had an Exacto knife and a rubber bouncy ball to help me with cutting and buffing the shielding. I also used a good portion of my vocabulary while peeling the backing off the copper, as it loves to curl on itself. Good thing I started with the shielding because that was the hardest part.


I clipped the wires of the old pickups (yellow for hot, black for ground), then soldered the new wires (white for hot, black for ground) in their place. The new pickup covers did not match the pickguard cutouts, so I kept the old ones (which means I didn’t bother to get a pic of everything assembled, as it looks the same as the before photo). Slap on some new strings and get to slapping. When I plugged in the frankenbass, I heard a beautiful sound: silence! No hum! The shielding worked. After turning up the volume, I was greeted by the warm tone that I wanted. Bright and clear, warm and round. It’s alive! It’s alive! It’s ALIVE! Best feeling ever.
Article by SoundGirl: Nicole Kirch
Another great article by SoundGirls: Relief for Event Workers: We Need Help
Follow SoundGirls on Instagram, Twitter


The mission of SoundGirls.org is to inspire and empower the next generation of women in audio. Our mission is to create a supportive community for women in audio and music production, providing the tools, knowledge, and support to further their careers. SoundGirls.Org was formed in 2013 by veteran live sound engineers Karrie Keyes and Michelle Sabolchick Pettinato and operates under the Fiscal Sponsorship of The California Women’s Music Festival, a 501(c)3 non-profit organization. In 2012, Karrie and Michelle participated in the “Women of Professional Concert Sound” panel at the AES Conference in San Francisco. The panel was hosted by the Women’s Audio Mission (WAM) and moderated by WAM founder Terri Winston. Terri brought together five women working in live and broadcast audio. The groundbreaking panel (which also included Jeri Palumbo, Claudia Engelhart and Deanne Franklin), provided young women and men a glimpse into life on the road, tips and advice, and a Q & A with the panelists. More importantly though, was how incredibly powerful the experience was for the panelists. We had all been in the business for 20 years or more, yet most of us had never met before that day and within minutes we bonded like long-lost sisters. We were struck by how similar our experiences, work ethics, and passions were and wondered why our paths had never crossed and how our careers would have been different had we been there to support each other through the years. Each of us are strong on our own, but together we were even stronger and a powerful force. We were empowered. Each of us had been asked hundreds of times in our careers: Are there other women doing sound? How did you get into sound? How would a young woman go about getting into sound? Through creating SoundGirls.Org, we hope to establish a place for women working in professional audio to come for support and advice, to share our success and failures, our joys and frustrations, and for empowerment and inspiration.
Read Full Profile